Friday, July 1, 2011

Val’s Original Sundried Tomato Polenta Bread

Bread in a basket by ValsPlay


Last week I had a yearning for the taste of summer along the Mediterranean Coast.  Of course I thought of sundried tomatoes!  Sweet tomatoes dried in the sun and marinated in a bath of olive oil and herbs.  Yum!

If you love sundried tomatoes and you love bread, then you MUST try my original recipe.  Here we go…

Ingredients:

  • 1/8 cup sundried tomato oil (This is the oil that the tomatoes are marinating in.  It gives the bread its wonderful flavor.)
  • 1/8 cup olive oil
  • 1/3 cup sundried tomatoes, coarsely chopped
  • 1 ¼ cup water (I like to use potato water if I happen to have it.  This is water I save from the pot after I have boiled potatoes.  The yeastie beasties love potato water!)
  • 1 tablespoon honey
  • 3 cups all-purpose flour
  • 1/3 cup cornmeal or polenta
  • 1 teaspoon salt
  • 2 teaspoon dry yeast

Preparation:

Using your electric mixer with a paddle attachment or your bread machine, combine the ingredients – keeping in mind your machine’s instructions.  


When kneading is done, let the dough rise for about 45 min. or until it has doubled in size.  (If you prefer hand kneading, see my note on hand kneading in my Best Ever Polenta Pumpkin Seed Bread Recipe.) 


Ready to be kneaded


Once the dough has doubled, pour it out onto a floured board or countertop.  (This is a slow-riser so be patient.)  Knead the dough by hand for about 5 minutes, and then shape into a round loaf.  

Let rise again until doubled in size.  (I use a damp cloth to cover the dough while it is rising.)


Ready for scoring

Scoring the loaf:

Once the dough has doubled in size (for the second time) using a sharp knife, score the loaf.  This helps in the release of steam during baking (and it looks lovely!)  I created a star pattern on my loaf.
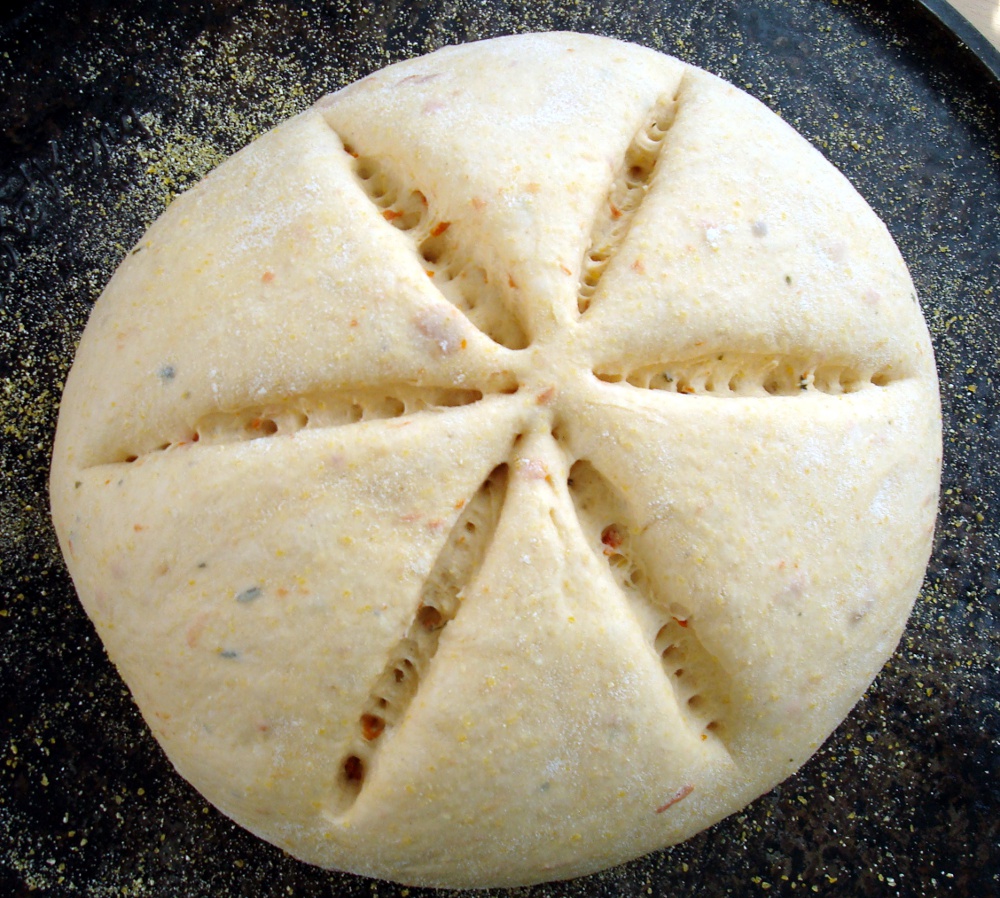

Scored with a star pattern

Baking:

Bake your loaf for about 25 to 30 minutes in an oven preheated to 385 Fahrenheit (about 195 C).  If you would like to try steaming as you bake, see my note below on the steaming technique.

Look how lovely!

A golden crust

Summer weather permitting, enjoy your bread "al fresco" with a hearty Greek salad.  Don't forget the wine!


Cooling on the terrace

Al fresco dining


Steaming the oven:

Steaming is a technique used by bakers who want to keep the dough moist during the first part of the baking cycle.  This allows the dough to expand fully.  I learned this technique from Rose Levy Beranbaum in her book, "The Bread Bible".  

For this recipe I used the ice cube method: 

Place a baking pan in the bottom of your oven.  I did this during preheating.  Just after you place the dough in the oven, take 4 or 5 ice cubes and throw them in the pan and then quickly close the oven door.  Bake as directed.

I cannot tell you how delicious this bread is.  You have to try it!


Sliced and ready to eat!


I would love to hear your experiences with this recipe.  How did it go?


Thursday, June 23, 2011

Freestyle Fabric Painting Tutorial


Last week my friend, Jen and I decided to experiment with fabric painting.  It is fascinating to see rich wet colors melt into the weave of cloth.  Perhaps I can inspire you to try it too!

You will need:
  • Acrylic paints in assorted colors
  • Brushes and sponges
  • Spray bottle filled with water (optional)
  • Containers for water (We used some old yogurt containers.)
  • Containers for mixing paints (Any old plastic container, preferably shallow, will work.)
  • Fabric (We washed our fabric first and let it hang to dry in a crumpled fashion.)
  • Plastic sheet to protect your work area

Now it's time to get started!
Squeeze out your paints and mix as desired.  (Jen made a lovely aqua blue.)
Wet your fabric in the sink or using the spray bottle.
Lay the fabric on your protected surface.

Water-soaked medium weight canvas cloth

Using a brush or a sponge, begin to work the color into the weave.  Don’t be too shy about the amount of paint you use.  Remember that the colors will fade as they dry.

Brush work

Sponge work

 If you want a more watery look, spray more water on the cloth's surface.

Sprayed surface

Once you have painted your fabric, lay it out to dry.  (We laid our fabric out on the concrete walkway in the sun.  It dried pretty quickly!)

Drying on the cement

After your fabric has dried, you can press it with an iron to set the color.  I used an old damp rag as a barrier between my iron – which my husband also uses for his work shirts! – and the painted cloth.
Wash in cold water (no soap needed) and hang to dry.

Here are some examples...

Pink and green swirls
Color riot

Other ideas:
  • Start with a dry piece of cloth, work the paint into the cloth, and spray with water.
  • Use a leaf or other object as a stencil.
  • Try painting ribbon or lace.  We painted some ribbon and then tied it twisties to create a tie dye effect.

What do you think?  Want to give it a try?

To see more examples, check out Freestyle Fabric Painting Expressions.  

Monday, June 13, 2011

Bohemian Bag Expressions

When I find a pattern or structure that I enjoy, I want to see it expressed in many ways.  This is how I came to make all those baskets in my Etsy Shop.  This is also why I am still playing with Bohemian Bags!

Here are a few of the latest “bag expressions”.

I made this first bag from fabric I bought at a street market in Provence.  I love the warmth of these colors.


I call this next pouch, "The Manly Bag".  I used earthy plaids and stripes to make this for my Dad for Father's Day.


This last bag was upcycled from fabric given to me by my dear friend, Penny.  As a thank you, I made Penny this funky pouch.


If you use my Bohemian Bag Tutorial to make a bag, I would love to see the results!  You can post a link in your comments.  Enjoy!


Tuesday, June 7, 2011

Best Ever Polenta Pumpkin Seed Bread


I am a bit of a baking nut.  I love baking cakes and cookies, quiches and casseroles.  But my absolute favorite is bread – yeast bread!  My father is Italian, so we never had a meal without bread.  Bread is essential to the Italian table!

One of my favorite ingredients in bread-baking is cornmeal or polenta.  Polenta gives bread a nice golden tint and it adds a little crunch, especially when the bread is toasted.  I also like to add seeds to my dough.  Seeds contribute protein as well as a warm nutty flavor.  Often I will put in a dash of seed oil too.  I especially like pumpkin seed oil as it has this lovely dark greenish brown color that gives the bread an extra nuttiness and a lovely rich tone.


Here is a bread recipe I have used for several years now.  It started out as a cornmeal bread recipe, but has slowly evolved into a multigrain seed bread.  Give it a try and let me know what you think. 

Ingredients:
  • 1.5 cup buttermilk
  • 2 tbsp. soft butter
  • 1 tsp. pumpkin seed oil (or other seed oil if you prefer)
  • ½ cup polenta (or any cornmeal)
  • ½ cup oatmeal (this adds moisture)
  • ½ cup whole wheat flour
  • 2 cups bread flour (or all purpose white flour)
  • 1.5 tsp. salt
  • ¼ cup hulled pumpkins seeds (or sunflower seeds if you prefer) 
  • 2.5 tsp. yeast

Preparation: 

If you have an electric mixer with a paddle attachment or a bread machine, just throw your ingredients together – keeping in mind your machine’s instructions – and let the machine do the kneading.  When the kneading is done, let the dough rise for about 45 min. or until it has doubled in size.  I like to cover the dough with a damp dish towel.  (If you prefer hand kneading, see below.) 

Once the dough has doubled, pour it out onto a board or countertop.  At this point shape the dough into a loaf and then roll it over a seed mixture.  The seeds stick to the dough and create a lovely pattern.  (I learned this from my dear friend, Lone.)


Place the loaf in a bread pan lightly coated with oil and dusted with cornmeal. (If you have a baguette pan like me, you can divide the loaf in two.  You won't need the extra dusting of cornmeal if you are using a baguette pan.) 

Preheat your oven to 385 Fahrenheit (about 195 C) and let the dough rise again.  This time it should need about 25-30 minutes. 

Once the dough has risen, bake it for about 25 minutes. (This may be less if you have separated the dough into two loaves.) 

Cool the bread on a wire rack for at least 45 minutes before slicing.  Yum!

  
A note about hand kneading: 

If you prefer to fully experience hand mixing and kneading, mix the wet ingredients with the yeast and salt, and then slowly add the flours and seeds.  Once your dough is well mixed, pour it out onto a large flat surface and knead away!  Here is a great instruction video from epicurious on how to knead:


I'd love to hear how this recipe worked for you.  Enjoy!

Thursday, May 26, 2011

Bohemian Bag Tutorial


After lots of travel this past month, I am ready to sit down and share a sewing tutorial. This one is for a fun and funky drawstring pouch. I call it a Bohemian bag because of its disregard for conventional patchwork rules and practices.

The idea for this bag was born several months ago when my sister sent me instructions on how to make a cloth portfolio using diagonal strips of fabric. The original portfolio was designed by Karen Montgomery and published in the Spring 2008 edition of Quilts and More. I really loved the crazy strips so I decided to apply the technique to a pattern I learned from Ayumi at the Pink Penguin.

Would you like to give it a try?


Cut out ten 3 x 10 rectangles, and then cut the assorted rectangles into uneven strips. (I used shades of red, black and white.)


Arrange the strips as desired, and then sew them together to make two pieced rectangles.

The seam allowance should be about 1/4" throughout the process, with one exception. (See instructions below for adding the casing.)


Press seams open, and trim to make two 9 x 10 pieced rectangles.

You have just completed the two tops for your bag. It’s starting to look pretty cool, eh?


Sew the two right sides together, and then cut the bottom two corners.


Turn the bag right-side out, and voila! You have completed the exterior!


Now it’s time to make the casing for the cords.

Cut out two pieces of fabric, measuring 9.5 x 2.5. Fold the edges 1/4", and press. Fold 1/4" again, and press.

Fold the pieces in middle, wrong sides together and press. (Are you tired of pressing yet? :P)


Sew the two casings onto the top part of the bag. (Sew very close to the edges.)


Now let’s make the lining.

Cut out two 9 x 10 rectangles.

Sew right sides together, leaving an opening in the bottom.

Cut the two bottom corners, just like you did with the outer bag.


Place the lining inside the outer bag, right sides together.

Sew the top edge so that the lining is attached to the outer bag.


Turn the bag right side out through the lining opening.


Press the top edge of the bag, and machine or hand-stitch lining closed.


Prepare two 30" long cords. (I like to use twisted cord; it just seems to add a nice touch.)

Thread one cord through casing and knot ends together.

Thread the second cord from a different casing opening, and again, knot ends together.


Now your Bohemian Bag is complete! Yeah!

Many thanks to designers Ayumi Mills and Karen Montgomery.  Thanks too to the folks of Quilts and More for their great website and publication.

One of these bags is listed in my shop. Come on by!

Click here to see some alternative expressions of this pattern.