Showing posts with label tutorials. Show all posts

Saturday, May 11, 2013

Shabby-Chic Sachets


Shabby-chic sachets
Now that my Mother's Day gift has survived our precarious international mail and reached Mom, I can share my creation - homemade lavender sachets! I'd been wondering what to make, when I came across some fabric and lace I'd stained with tea. Feeling nostalgic, I thought, "Why not shabby-chic vintage-esque sachets?"

To make the sachets, I cut my fabric into four rectangles, and finished one edge of each piece. Then I sewed on the lace and adored each lace strip with an old-fashioned button.

Adorning the rectangles

Lace and buttons
I sewed the pieces together to make two small rectangular pouches. I decided on French seams, which would make it easier to refill the sachets in the future.

Ready for filling
Finally, I filled the pouches with French lavender and tied them closed with a satin ribbon.

Voilà!

What did you give your Mom for Mother's Day?

Happy Mother's Day to all Moms out there!

Shared with nifty thrifty things.


Sunday, November 18, 2012

Fabric Christmas Tree Card Tutorial

Fabric tree cards


Ever wonder what to do with all those little scraps of fabric left over from a project?  Christmas cards!  This struck me as I was looking down at a pile of little triangle-shaped scraps left over from one of my basket projects.  The tiny shapes seemed to be calling me.  Make me into something!

A stylized tree


The little triangles reminded me of the "stylized" trees we used to draw as kids.  So, I gathered them together, along with some fabric glue and blank cards, and I started to play.

Each is unique!


What a fun project for kids too!

Want to try it?  Here's all you need:

  • Fabric pieces in a variety of patterns and colors
  • A fabric glue stick
  • Blank cards with matching envelopes
  • Stamps for a message (optional)

Tools and materials


The process is easy!

  • Snip your fabric into triangle shapes.  
  • Take a triangle and rub a bit of glue on it.  
  • Place it at the top of your card.  
  • Now take the next triangle, add glue, and place it just below and to the left of the first triangle, overlapping a bit.
  • Continue building downward and outward, and before you know it, you have a tree!
  • If you want your tree to have a trunk, just snip a little rectangle and glue it to the base.


You can go with traditional colors or mix it up with fun unorthodox combinations


You can build one big tree, or several small ones.  Soon you will have a set of a lovely handmade cards to send for the holidays!

Make a set!


You might enjoy some of my other tutorials...

Got a few minutes?  Come by to see what's new in my shop...

Happy crafting!


Monday, September 3, 2012

Project Ms. Kitty

Say hello to Ms. Kitty!


This summer I happily made a project for our first grandchild.  I swear I cannot be that old!  I love using a mixture of new and recycled materials, so I looked around for a nicely worn clean pair of jeans and went to work on Project Ms. Kitty.

I found Ms. Kitty's pattern from a blog called Cherryskin.  It's simple and easy to follow.

Free pattern from Cherryskin


Using the free pattern, just cut out your pieces, sew them and stuff as instructed.

Clockwise from lower left: cutting, stuffing, assembling, and pinning


After you have sewn all parts together, draw and embroider Ms. Kitty's face.  Add any other embroidery details you may like.  I added pink ears and a colorful tummy fish.

Ms. Kitty loves fish!


Once your Ms. Kitty is finished, you might want to give her some clothes.  I decided on a nice Austrian boiled wool jacket and a cute little skirt.  After all, Ms. Kitty is from Austria!  I made the jacket by tracing Ms. Kitty's outline on a piece of paper.  Then I used the paper pattern to cut out the boiled wool.  I sewed back and front together and embroidered edges and front.

Clockwise from left: embroidered wool sweater, traced pattern, cutting back, cutting front


I sewed a little elastic waist skirt to finish the outfit.

Cotton skirt embellished with lace and ribbon


I really love how Ms. Kitty came out...

She's ready to play!


Give the pattern a try and let me know your results.  Okay, now it's time to get back to my shop!

Interested in tutorials?  Click here.

Shared with Made By You Monday @ Skip To My Lou and Sunday Linky Party @ Petite Hermine.


Thursday, July 19, 2012

Tea Dye Tutorial


Before (above) and after (below) the tea dyeing process

Last week a client asked me to make a basket in the natural earthy tones of the Arts and Crafts movement.  I thought a lovely tea color would work well with the theme.  So, I found the darkest tea in my cupboard, a rich breakfast tea from Turkey, and went to work!

If you'd like to give tea dyeing a try, here's how to do it...

You will need:

10-12 bags of dark tea
1 yard of pre-washed fabric (cotton, linen, wool, and silk work best)
2 large bowls or pots (I used one 8-qt pot and one large ceramic bowl)
Boiling water

Dark Turkish tea - perfect for dyeing fabrics

Let's get started…

Place the tea bags in the bowl and add boiling water.  Let the bags steep for about 20 minutes, until the water is very dark in color.

Letting the tea bags steep

While the tea is steeping, place the fabric in the second bowl or pot and add cold water.  Wetting the fabric insures that it will take the dye evenly.

Wetting the fabric in cold water

Once the tea solution is good and dark, add the wet fabric.  I left the tea bags in with the fabric, which did not seem to cause any uneven color.  (Of course, you may want uneven color!)

Soaking for 5 or more hours

Let the fabric soak for about 5 hours, or overnight if you prefer.

After the fabric has reached the tone you desire, remove it from the tea solution and rinse in cold water.  When the water runs clear, wash the fabric in your washer, and then place the dryer for a short cycle.  This ensures that the color has set.

Voilà!  You now have lovely earthy tones, perfect for your next project!

Warm earthy tones

If you enjoyed this tutorial, check out my fabric painting tutorial.


Sunday, May 6, 2012

The making of a basket

Independence Basket


I thought it might be fun to offer a short tour of basket making.  My sister taught me this craft years ago.  I can't seem to get enough of it!  There are always new colors and patterns to explore, and new ways to embellish a piece.

Here we go...

First, I wrap reinforced cotton rope with fabric cut into strips.  Sometimes I use fabric scraps that quilter friends and family send my way. Sometimes a generous clothing designer will share pieces.  Sometimes I use fabric from gently used clothing.

My pile of possibilities

If I am making a round basket, I start by pinning the wrapped rope into a small coil.  Like this...

The beginning

Then, starting from the very first curve in the coil, I zig zag around and around, watching as the pattern unfolds.  This is the fun part!

A pattern emerges

When I am ready to shape the sides of the piece, I bend the disc, forcing the rope to turn upon itself.  This part can get a little tricky at first, but with practice...

Working the sides

Another important ingredient to my process is a visit from my cat, Dusty.  Fortunately, he has learned to stay out of the way...

Hanging out (of the way)

Lately, I have been embellishing the top of my baskets with a bit a ribbon.  I love the striped pattern.  Here, I leave a long piece of ribboned rope, which I use to create a design on the basket's side.

The tail

I pin a swirl pattern onto the basket and tac it down with needle and thread.

The final touch

And voila!  My Independence basket is complete.

Independence Basket

I hope this encourages you to be creative today.

You can see all my baskets in my shop, SquareCircleWorks on Etsy.


Sunday, October 16, 2011

Fall Flower Bouquet Tutorial

Fall flower bouquet - short vase


Wondering where I have been?  Busy helping my daughter plan her fall wedding!  I was so excited when she asked me to take the lead on decorations, but I had no idea what I was getting myself into.  No worries.  I am always up for a challenge, and the accompanying opportunity to learn.

My latest teacher is my talented friend Natasha.  Not only is she a gifted artist; she is also a fabulous floral designer.  Last week Natasha taught me how to make fall flower arrangements for my daughter's November wedding.  I thought I would share what I learned...


Orange red roses before they are cleaned


The following list is for a tall vase bouquet.  However, if you prefer, you could use a short, five to six inch vase.  Just use one third less flowers.

For the tall bouquet, you will need:

  • One 18 - 20 inch vase
  • 10 - 12 apples and 1 or 2 lemons
  • chicken wire or similar bendable grid
  • 1 bunch of oak leaves
  • 3 orange lilies
  • 5 red or orange daisies
  • 1 small bunch of heather, approx. 1.5 inches in diameter
  • 3 green daisies
  • 6 orange or red roses
  • 3 pink alstroemeria 
  • 3 stalks of dill flower
  • 2 stalks of chinese lantern
  • 6 feet of small gold wire.
  • sisal thread and raffia (optional)

Before beginning the arrangement, be sure to clean all of your flowers.  Their stalks should have no leaves and should be cut at a diagonal.

Using a sharp knife, cut the stem at a diagonal


Now it's time to go to work!

Rinse the vase, and then add the apples into it, making sure to fit them well so that they will not float once the the vase is filled with water.  When you are about two to three inches from the top of the vase, use the lemons to further wedge the apples into place.  (The lemon skin is nice and flexible.)

Add cold water until the fruit is completely covered.  Make sure you will have enough so that the flower stalks will be able to drink!

Beginning to add the water


Apply the chicken wire or grid to the top of the vase.  (Natasha made her own grid out of some wire she had at home.  Clever!)

Natasha makes a grid to fit the vase


The wire grid supports the bouquet


Here's where it really gets fun!

Start adding the oak leaves.  They should be about 16 inches in length, including stem and leaves.

Oak leaves are added at angles


Next add the three lilies, cut at approx. 12 inches in length, making a triangle placement.

Adding the lilies


Add the red/orange daisies (cut at 11 inches), the heather, and the green daisies (also cut at 11 inches).

Keep in mind that this is a tall vase and most of the flowers should be around the edge where they will be seen.

The red daisies before cleaning


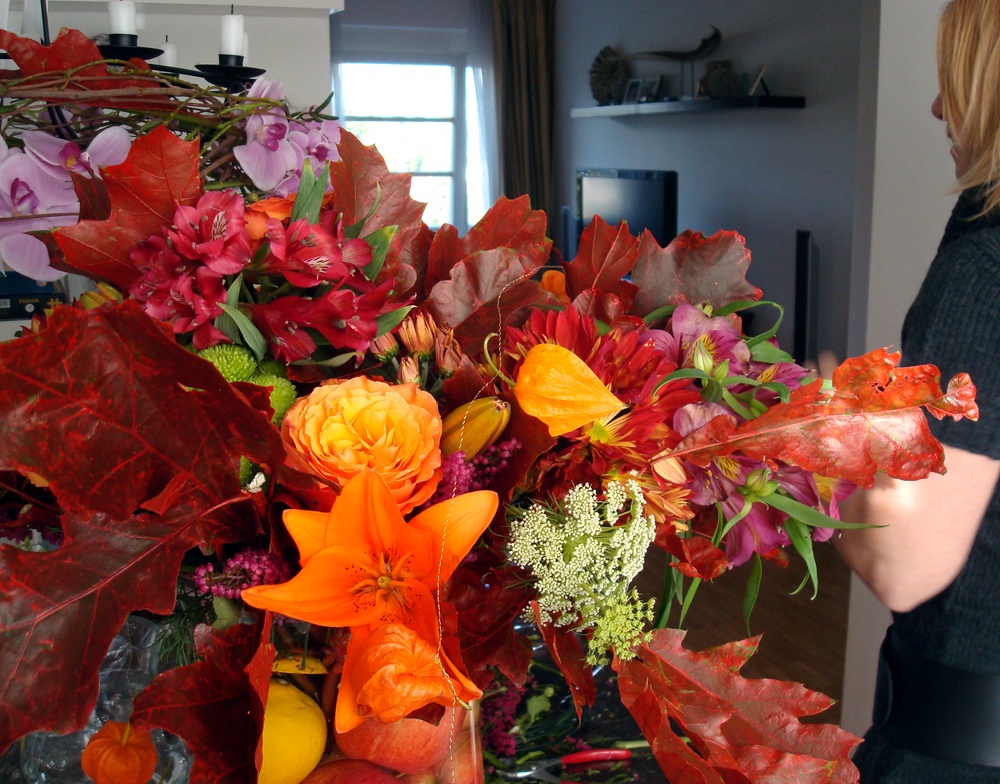
Now add the roses, alstroemeria, and dill (all cut at about 12 inches).
Almost done!


Isn't this looking fantastic?!

Next we will use the chinese lanterns to make two garlands.

Chinese lanterns and dill


Cut your length of wire in two so each measures approx. three feet in length.  Remove the lanterns from the first stalk, and wrap each lantern stem along the first wire.  (The process is: one wrap of the wire around a stem, followed by a twist.)  Try to make the distance between each lantern random.  Repeat for the second stalk and wire.

Gold wire and sisal thread


Once your two garlands are complete, hand them over the bouquet.  They look like earrings!

Fall flower bouquet - tall vase


Finishing touches

If you would like, you might also add a bit of raffia to cover any part of the vase that still shows chicken wire.  You could also add bits of orange sisal threads around the bouquet to give a halo effect.

Now imagine a small wedding reception hall full of these tall and short fall flower arrangements!  It will be striking!

Another view of the short vase version


Interested in seeing all of my tutorials?  Please click here.


Thursday, June 23, 2011

Freestyle Fabric Painting Tutorial


Last week my friend, Jen and I decided to experiment with fabric painting.  It is fascinating to see rich wet colors melt into the weave of cloth.  Perhaps I can inspire you to try it too!

You will need:
  • Acrylic paints in assorted colors
  • Brushes and sponges
  • Spray bottle filled with water (optional)
  • Containers for water (We used some old yogurt containers.)
  • Containers for mixing paints (Any old plastic container, preferably shallow, will work.)
  • Fabric (We washed our fabric first and let it hang to dry in a crumpled fashion.)
  • Plastic sheet to protect your work area

Now it's time to get started!
Squeeze out your paints and mix as desired.  (Jen made a lovely aqua blue.)
Wet your fabric in the sink or using the spray bottle.
Lay the fabric on your protected surface.

Water-soaked medium weight canvas cloth

Using a brush or a sponge, begin to work the color into the weave.  Don’t be too shy about the amount of paint you use.  Remember that the colors will fade as they dry.

Brush work

Sponge work

 If you want a more watery look, spray more water on the cloth's surface.

Sprayed surface

Once you have painted your fabric, lay it out to dry.  (We laid our fabric out on the concrete walkway in the sun.  It dried pretty quickly!)

Drying on the cement

After your fabric has dried, you can press it with an iron to set the color.  I used an old damp rag as a barrier between my iron – which my husband also uses for his work shirts! – and the painted cloth.
Wash in cold water (no soap needed) and hang to dry.

Here are some examples...

Pink and green swirls
Color riot

Other ideas:
  • Start with a dry piece of cloth, work the paint into the cloth, and spray with water.
  • Use a leaf or other object as a stencil.
  • Try painting ribbon or lace.  We painted some ribbon and then tied it twisties to create a tie dye effect.

What do you think?  Want to give it a try?

To see more examples, check out Freestyle Fabric Painting Expressions.